Trang

Hiển thị các bài đăng có nhãn DIY. Hiển thị tất cả bài đăng

Thứ Hai, 3 tháng 3, 2014

Beauty: Two Toned Lips

Hi ladies, it's me again- Rachel from Life Unsweetened. Today I'm going to give my thoughts on how to pull off the two-tone lip. I know what you're thinking- two colors at once, that seems a bit scary- but I promise it's not. The best part about this trend is that there are a ton of different ways to wear it. So whether you're a lipstick newbie or a daring lady who wants to make a statement, here's how to pull off the two-tone lip trend.  


Beginner- A touch of color on the center. If you're scared to try the two-toned lip, this is the best way to start. Apply your regular color, a tawny pink like Yves Saint Laurent Rouge Volupte Lipstick in "Nude Beige" works well for most skintones, lightly all over your lips. Then add the pop of color to the center of your lips with a glossy red stain, like Tarte LipSurgence™ Lip Tint in "Swank". Pat it on with your fingers to control the amount of color you want, this way you can't go overboard. If you've applied too much, simply blot with a tissue and you're good to go!

Intermediate- A true ombre lip. If you want to try something a bit bolder, an ombre lip is the way to go. The basic look of an ombre lip is dark on the outside and gradually gets lighter as you go to the center. The best part about this look is you can choose any color group  you want. For example, for a red ombre lip, you'd use a burgundy lip liner, a brick red lipstick for the middle and then a pinky-rude on the center. To copy the look above, first apply a deep red lip liner (like NARS Lipliner Pencil in "Amazon"). Fill in your lips with a perfect red shade, like Maybelline Color Sensation Lipcolor in "Are You Red-dy". Finally, add a fuschia-pink (like MAC "Candy Yum Yum" Lipstsick) to the center for some drama. Top it off with a clear gloss if you dare!

Expert- Different colors on bottom & top lip. I've only seen this look on the runways or in pages of Allure, but I commend any woman who tries this in real life. While it may not be appropriate for work, you could try it for a fun girl's night out. As crazy as it may look to you, it's actually the simplest look of the three. Apply two contrasting colors to your lips- one on the top and one on the bottom. A color combo that can't go wrong? A hot orange on top and a bright pink on the bottom. I suggest Revlon Super Lustrous Creme Lipstick in "Siren" and Sephora Collection Rouge Shine Lipstick in "Just Dating".  


Which one of these looks would you try? 


-post by rachel 


Thứ Hai, 27 tháng 1, 2014

DIY: Chocolate-Dipped Glitter Apples

Hello everyone! How was your weekend?  As for me, I decided to get creative (as usual) over the weekens & make some dark chocolate glitter apples. I love Dark chocolate & for this DIY I used Green & Black's 85% bar & Honey Crisp apples. These particular apples are ideal for this because they're always crunchy, juicy & sweet!  So.....keep reading below to learn to make these beauties.


Directions:
  • Rinse off your apple with water & dry it well. Chop the honey crisp apples into slices - you can slice them into relatively thin pieces like I did mine. 
  • Once the apple is chopped, dry it again to remove the excess moisture so that the chocolate will have an easier time adhering to the apple.   
  • Break your Green & Black's bar into small square pieces - I used about half of the bar for one apple.  Put the chocolate into a small, but somewhat deep bowl.  Insert the chocolate into the microwave & add 30 seconds.  Keep an eye on it the whole time as chocolate tends to get hot fast and burn!  If this happens, it will NOT go on smooth & you will have to re-do. After the 30 seconds, remove the chocolate from microwave & stir a bit.  If the chocolate hasn't melted, add it into the microwave again for another 10-15 second interval. Remove again & stir until it is fully melted.  Stirring will help melt the chocolate faster.  Once it is melted with a smooth consistency, then it is time to dip your apple pieces! 
  • Dip one apple slice at a time halfway into the bowl, you can use a spoon to fill in any spots on the apple not covered with chocolate. I decided to dip them halfway - it's just easier to hold. Hold the apple in the air over the bowl & let any chocolate-drippings fall into the bowl. Once it feels like it's no longer dripping, carefully place it onto a clean plate. Once placed down, do not move them around or it will be a mess!  Repeat this with every slice - once you've dipped all the pieces, it's time for the decor with glitter!!
  • I decided to decorate the apples with edible glitter from Sunflower Sugar Art. They have some amazing glitter - this stuff shines in any light & looks like actual glitter! But totally edible! For my DIY - I chose the American Gold disco dust.  Just place some glitter in your hand & sprinkle it over the plated apples. There you have it!


image above & below via Sunflower Sugar Art


-top photo by jen ramos


Thứ Năm, 19 tháng 12, 2013

DIY: Cappuccino Heart Stencil

I've been on a major coffee kick - because I now have a Nespresso Machine in my office - thanks to Nespresso who gifted this gorgeous machine to me for Christmas! So grateful!

Speaking of coffee, I decided to get creative today & create an easy DIY heart stencil for your next cup of cappuccino.  This is a creative way to bring a SMILE to anyone's face this Holiday!  It's like 1-2-3 .......that easy, so here we go!


Step 1: Fold a piece of paper in half, then using a scissor, cut a heart shape on the folded end like I did above. You are going to use the cut out - not the heart.  So don't worry too much about the heart shape at this point, just throw that part away.  The cut-out you can be perfected by using your scissor & making it more shapely if you wish.  Make it pretty because... that will end up being your stencil.


Step 2: So, here it is below, my heart stencil!  It's exactly the shape I want it - so now we can bring on the coffee & the cocoa powder.  I'm using Nespresso coffee for this project along with Scharffenberger sweetened cocoa powder.  You can use un-sweetned too, doesn't matter.


Step 3: I then take my heart stencil & place it over the cup of foamy cappuccino & while holding it with one hand, I sprinkle the cocoa powder all over it, making it nice & dark!  Best to use a shaker tin so the powder comes out slowly & even.


Remove the stencil carefully & ta da!!! There you have it - a beautiful heart cappuccino!! Neat huh?


P.S. Don't forget to enter our Nespresso machine giveaway here.


-images by jen ramos


Thứ Tư, 20 tháng 11, 2013

West Elm DIY Event

Last week was the West Elm event I hosted & so many wonderful ladies showed up! It was such a blast to show the girls "how-to-create" the DIY painted mugs! It's simple, yet fun.

Firs,t we kicked off the event with some delicious mini-cakes by Sherry's Shortcakes - these are delicious Vegan mini-bites made up of organic ingredients. Then we served up some hot Chocolate - which was perfect for the chilly weather that evening! I then explained to the girls how to create their own painted mug & everyone loved it! So much talent - & perhaps even future artists?? I MINGLED with the girls & then we gave away 2 (framed) Cocoa & Hearts paintings, 20% off MADE BY GIRL + this gorgeous agate jewelry box!  I'm so grateful to have been able to collaborate with Wes Elm here in New York City - & super grateful to all the girls who came out to be part of this workshop!

The images were shot by photographer, Christine Han - all the way from Brooklyn. This girl was everywhere & shot all these amazing moments for us! She also has a cool food blog called 'Pantry Confidential' - which I think you food lovers will enjoy!

All in all, it was a packed house - (good news!) so hopefully I'll get to host something there again soon! If you see a pic you want to instagram - feel free to TAG it: #madebygirl & #westelm.


Where's Waldo?


Champagne time - thanks to my friends!


Images above by Christine Han

This last image is a quick shot my husband took of me & my friends who came out to share this moment with me! Love you all!


Don't forget to keep an eye out for NEW paintings being added to the Cocoa & Hearts gallery this month!!!

Did you attend the event? How did you like it?

How to: DIY Painted Mug

If you were curious what I spoke about at the DIY event at West Elm last week, here it is!

I explained how to create DIY Cocoa & Hearts style mugs. Some of the girls made their own designs, but many of them took a stab at the color series I usually do in the C & H gallery.  You can see the "how-to" tutorial here. We had a blast! In fact, you'll get to see PHOTOS of the event on my blog - stay tuned!


via Front & Main blog

Thứ Tư, 23 tháng 10, 2013

West Elm + Me in NYC! You're Invited!!

Ready for the Holidays?

I'd love to INVITE you guys to join me at West Elm for a DIY project I'll be hosting! Come have fun, get creative & enjoy some sweet treats + a SURPRISE giveaway!  You don't want to miss it!  It will all go down on:
  • Thursday, November 14th, 2013
  • West Elm Broadway E. 62nd st. store here in NYC.
  • Time: 6:30-8:00 pm
  • RSVP at:  facebook.com/westelm/events

Here's the official invite below created by West Elm!


YOU CAN RSVP HERE


-images & styling by jen ramos


Thứ Năm, 17 tháng 10, 2013

DIY: Rockstar Pumpkin

I posted this cute little Rockstar Pumpkin on my Instagram not long ago & it got a lot of great feedback! So I thought, why not turn this into a little DIY feature? It's so easy.

Pumpkin decorating is essential for Fall – it's a great accessory to keep around the house, whether at a desk or a dinner setting during the Holidays. The best part is, you can't do it wrong! You can decorate your pumpkin however YOU want! So, if you're inspired by my Rockstar Pumpkin, and want to give it a shot – I've prepared some easy-to-follow instructions:


WHAT YOU WILL NEED:
  • Pumpkin – I used a 5" one, but the size is completely up to you!
  • White acrylic paint – I used Liquitex® Basics from Michael's
  • Foam Brush – you can find a similar brush that I used here
  • Golden Pyramid Brass Studs – I used these 3/8" studs, but sizes vary!
  • A sheet or old fabric you don't mind getting paint on!

HOW TO ROCKSTAR PUMPKIN:
  • Begin by simply painting your pumpkin in its entirety. I chose white because I like how the white and golden studs looked together, but you can choose whatever color speaks to you!

    The size of your brush should depend on the size of your pumpkin. The bigger the pumpkin, the bigger the brush should probably be to make the process easier. A smaller brush should be used around the bottom of the stem to avoid getting any paint on it. Careful – that area is tricky!

  • I'd suggest 3 coats of paint but wait a few hours in between in each. After the paint on your pumpkin has dried, it's time to apply the studs! I used the Medium 3/8" studs, but you can choose whichever size you'd like. If you want a more "flashy" pumpkin, you can go ahead with bigger studs!
  • Push in the studs wherever you'd like. I scattered mine around the circumference of the pumpkin – play around and see as you go to decide whether you want more or less. You can also arrange the studs to spell out a word or create a shape!

  • Ta da! You have your pumpkin!! Use it to add a touch of fun to your desk like I did, or display it on the table at your next dinner party. Enjoy.

Maybe next time I'll try adding a mohawk. Ha.


- images by jen ramos


Thứ Tư, 10 tháng 4, 2013

DIY: Trim Wrap Bracelet

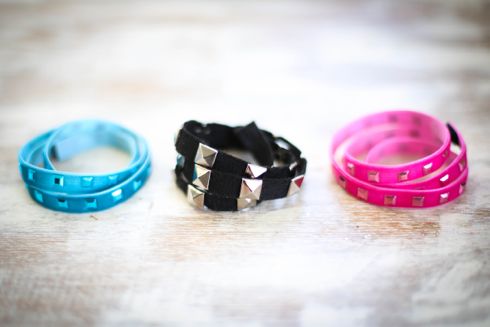
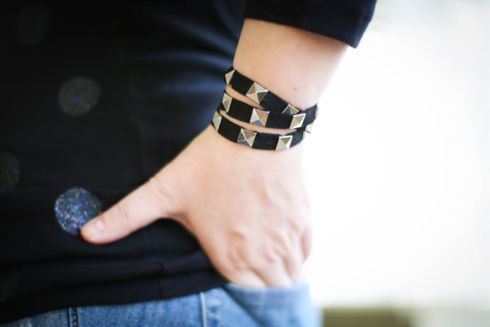
Hi, it's Stephanie from Henry Happened back with another DIY. I did tell you I loved bracelets, right? Well, I wasn't lying! Read on for the tutorial on how to make the easiest wrap bracelet ever. These DIY bracelets are great for teenagers!

 AZ0A1643 

 Have you ever roamed the trim section at JoAnns? No?! Well, you might be surprised at the selection of ribbon, lace, and even fur trim you can find. The bright colors of this trim called to me (yes, it even has studs!) so naturally I found a way to make it into a simple wrapped bracelet. 

IMG_3872 

What you'll need for your own wrap bracelet:
  • About 1/2 a yard of whatever trim you like. Go with a neon studded one or try a Greek key, floral or Baroque pattern. I'm telling ya - there's a ton to choose from!
  • Sticky back Velcro
  • Scissors
IMG_3875 

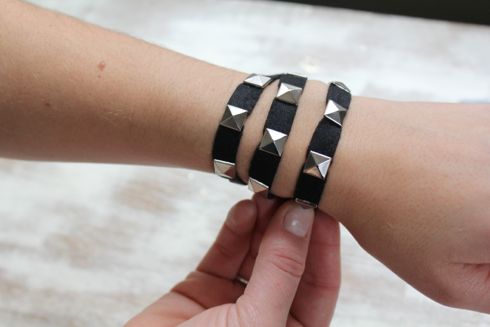
First, measure your wrist with the trim. I like a 3 wrap bracelet but position it how you like it on your arm and then cut the length. 

IMG_3877 
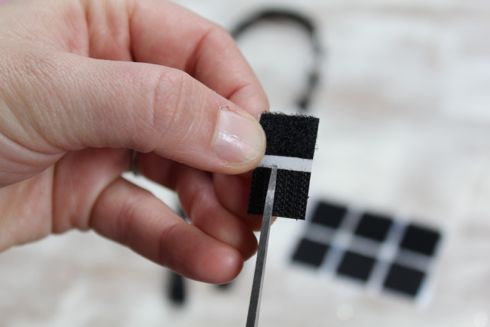
Then take the Velcro and cut a piece to fit the size of your trim. 
 IMG_3878 

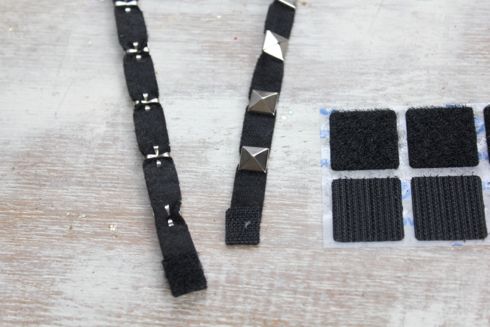
Attach the sticky side to each end of the trim, and, voila!, you are done. The Velcro closure is a bit of a miracle because I can never manage to get my bracelets on with one hand. Please tell me I'm not the only one? 

AZ0A1642 

Wear the bracelets on their own or make a couple and stack them together.

 IMG_9236 

What kind of bracelet stack are you planning to wear this spring?


-post and images by stephanie gerber